Heck its been a busy weekend!
I've just surfaced long enough to breathe and write up this post. June is crazy birthday month in my family and things are just cranking up with a few jobs on the go the get me into the groove. This weekend just past I created a dozen Birthday Cupcakes with a Bowling them, A Twilight inspired 13th Birthday creation accompanied by 20 Twilight Cake Pops, a 65th Birthday Fruitcake for my Dad.
OK let me talk you through the CakePops first off.
I created 20 red velvet cake pops using a baking mold. Meaning that rather than creating the pops by baking cake adding frosting mixing and then molding - I actually baked balls of cake. I actually prefer this style of cakepop as I find the other too sickly sweet as who really needs cake plus frosting mixed then coated again in chocolate - overload! So these were baked balls of red velvet cake coating in milk or dark chocolate then decorated. Ax these were to accompany the Twilight cake I made half white and half black - tinting the dark chocolate black which looked excellent.
I had purchased at Spotlight a crafty cardboard flowerpot for a few dollars which I had spraypainted silver and affixed a Twilight image to the front of. I then had covered a polystyrene ball in black felt and placed this in the top of the pot firmly then stuck the pops into the ball to create a bouquet. Simple and effective. These were stored in the fridge overnight.
On the day of delivery the kitchen was very very busy. I created a dozen Red Velvet Cupcakes on Saturday morning for a 7th Birthday Party with a Bowling Theme. I used the same Red Velvet Cake recipe as in one of my early blog posts from last year. After cooling them they were piped with a cream cheese frosting that had been tinted either pink or blue - half pink - half blue. I had made the toppers for the cupcakes earlier in the week and they were 3 Bowling Pins and one Bowling Ball for each cupcake with the Number 7 on one Bowling Pin each.
My most massive regret, and I will learn from this most definitely - was that I should have 'set' my frosting on the cakes by putting them in the fridge for a little while before fixing on the toppers. Although the cakes were cool, as the icing was still quite fluid - the added weight of the toppers made the beautifully swirled frosting start to s l iiii d e... Arrggghhh! In addition I created a small fondant banner with the name of the Birthday Girl on it to attach to the top of the cupcake stand.
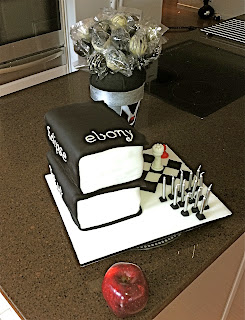
Next cab off the rank on Saturday morning was the creation of the Twilight Cake Books... I had made a large sheet cake tin sponge and halved it to create the two books. The party was for 20 so I needed enough cake for 20 girls - plus the brief was for sponge filled with fresh cream and strawberry jam. This although simple, meant a last minute, one shot cake that would need to be made, filled, decorated and delivered all in one day - quite an undertaking.
I had prepared the cakeboard the day before covering it in white fondant and trimming with a black satin ribbon. Then the chessboard was created and the two chess pieces were modeled and added. I also created fondant 'plinths' for the 13 candles which added a nice architectural effect to the board.
OK so step one after cakes were baked, cooled and cut was to fill one with fresh cream and jam. I kept thinking that the job of creating the books should be easy - it seemed too easy. Surely I was just looking for potential pitfalls... well all went smoothly. I had though through the order very carefully.
Cake filled then it was time to crumb coat it with a buttercream layer. After the buttercream I added the white 'page' band to the book. After this was comfortably in place - I used a large cakeslicer to transfer the cake from the bench to the board position which went smoothly. The next piece of the puzzle was the black cover which was measured carefully, cut and lifted and placed on without a hitch. The lower cover book edging was then added.
I worked through exactly the same process for the top cake book and then using a large knife made the mage indentations on the white fondant.
Now was the part I had been dreading - the titles and name... I am not great with lettering. In fact I am atrocious! I scoured the internet for ideas on how best to do the Twilight lettering. I tried cutting out the lettering font which I had printed off with a scalpel - nup that wasn't gonna work - way too fiddly. There was nothing for it I was gonna have to freehand it....arrrgghhh! I practiced and practiced. Keeping the printed font in front of me so I knew the style I carefully wrote the titles and the name and was actually thrilled with the outcome. A tad shaky in places but all good - the shakes were from the 4 huge cups of coffee I had consumed I think - hahahaha.
All was delivered safe and sound and the birthday girl seemed very happy which is the reason why I do this :-)
Enjoy
Lx


